“Here are three random techniques. Let’s drill them with no resistance and then roll.” If you’ve had the misfortune to train this way you’ll understand how terrible it is. The naturally gifted will improve while everyone else flounders. It leads to frustration and ego problems. Let’s move beyond this.
The goal in BJJ is to be able to roll against a fully resisting opponent. The logical approach is to start with an unresisting opponent and progressively increase the level of resistance until you have a fully resisting opponent. But it’s not as simple as just starting with light resistance then progressing to heavy resistance. In every training session, people of different weight and skill will be partnered together. How is it possible for a 50kg person to provide sufficient resistance so a 100kg person can improve their skills? Or a white belt to a purple belt?
The key is to understand what is progressing in progressive resistance. It’s not so much a physical resistance as it is a technical resistance.
When strength training, you start with a lighter weight and progressively increase to a heavier weight. With BJJ you are not training strength but skill, so the resistance should reflect that. As a coach, merely instructing your students to “use 20% resistance” is inadequate. Partners of unequal weight or skill become confused “You’re a purple belt and I’m a white belt so I should use more than 20%, right?”. Partners of the same weight and skill argue “That’s 30%, not 20%. Stop cheating”.
To lessen the effect of a strength imbalance, both training partners should use as little strength and explosiveness as necessary. But more importantly, the coach should dictate the specific, unambiguous technical resistance to use.

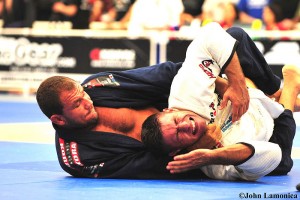
Rolles Gracie defeats Lee Mein via arm triangle.
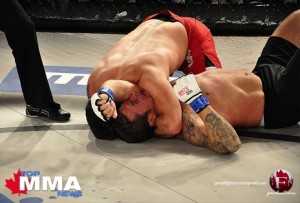
We’ll use a concrete example: practising the arm-triangle choke from mount. This submission has a simple sequence.
- Raise one of your opponent’s arms.
- Position yourself so that your bicep is against one side of his neck and his own shoulder is against the other.
- Remove any slack by lowering your chest and circling your body before squeezing your arms to finish the choke.
Assuming that the students have basic familiarity with the choke, here is one1 sequence using progressive resistance to improve their skill in applying it. All the following instructions are for the opponent (bottom player).
After a few repetitions with no resistance, the first resistance is to try to prevent your arm from being raised. That is the only objective. Don’t fight the rest of the choke and don’t try to escape the mount. The method is to use as little muscular strength and movement as possible. You might hold your hands together, bridge your hips, push your opponent or anything else. Don’t just do the one form of resistance, change if you feel your arm is about to be raised. Be creative and find what is most effective at stopping the top player from raising your arm.
Once the arm is raised, all resistance stops and the top player finishes the choke. The resistance is isolated to this one area of raising the arm. A coach would expect to see the top player using a range of techniques to try to raise the arm; threatening ezekiel chokes, pushing with elbows for greater leverage, switching to side control and back to change the angle etc.
After the top player starts having regular success, we up the ante. The bottom player is now instructed to attempt to escape the mount as a means of preventing their arm from being raised. If the students are new to this type of training, it is extremely important that the coach emphasis that this a drill and not a roll. The reason we are doing it is so the top player can practise the choke. It is not an opportunity for the bottom player to practise their mount escape. Students from gyms that don’t practise progressive resistance often have trouble at this stage.
When your arm becomes raised, try to prevent the top player pinning your shoulder against your neck. You can buck, turn on your side, grab your inner thigh or any improvisation that keeps your shoulder away from your neck. You’re still resisting your arm being raised and you’re still using the smallest amount of muscular strength and movement as possible. When your shoulder gets pinned to your neck then the resistance stops and the top player finishes the choke.
Here the top player learns all the important details of having a tight hold in this position. Their elbow will be on the ground. Their head will be pressed tightly against their opponent’s head. Their hands will be gripped correctly. If the coach sees that the top player is missing technical details, he should suggest resistance that the bottom player should provide that gives the top player an opportunity to develop the correct technical response.
e.g. If the elbow of the choking arm is not on the ground, the coach might suggest that the bottom player “turn into your opponent and push his head with your free hand”. This brings the space to the attention of the top player. Resisting the head push by driving into it will bring the elbow back down to the ground.
e.g. If the top player’s hands are gripped incorrectly, the coach might suggest the bottom player “bring your feet to your butt and wiggle backwards”. This movement of the bottom player applies external rotatation the top player’s choking arm, signaling him to regrip.
Now you’ll be resisting all of the choke. If your opponent positions your shoulder against your neck, don’t let him tighten the choke. Follow him as he circles and try to create space between your shoulder and your neck. If your opponent is off balance, feel free to reverse him.
Here we are drilling the final step of technical resistance. The top player will learn to maintain tight head pressure, have a low base to prevent being reversed, and use his knee to maintain space as he circles.
Finally the coach will add strength and explosiveness to the resistance. If there is a consistent weakness in a particular area, then a new drill is created to emphasize the weak area. Perhaps strength and explosiveness are only allowed in the weak area, or perhaps they are disallowed in the weak area but allowed everywhere else.
The take home message from this example is that the progression of the resistance should be technical (movement based), rather than attribute (strength, flexibility, power) based. This provides the student with an environment where they feel comfortable to experiment and fail, which is necessary for them to learn to succeed. Only once a technical ability is developed should attributes be emphasized.


 I was recently pointed to a
