Posts

On teaching submission defence

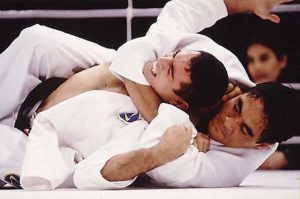
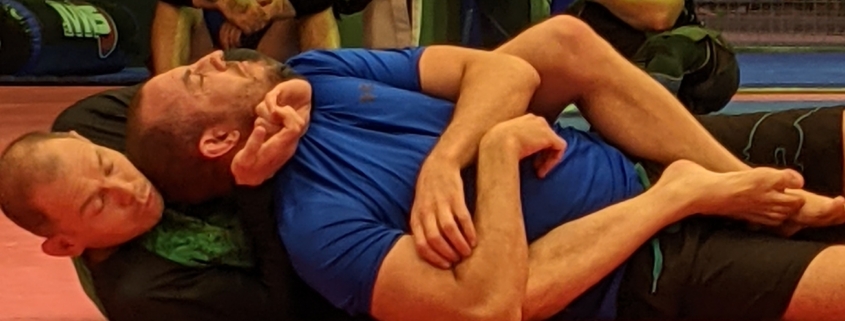
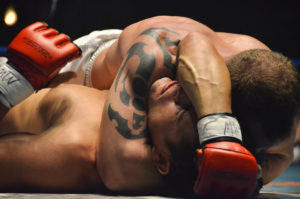
The goal of BJJ is to submit your opponent. The counterpoint of that is to not get submitted yourself. How do I go about teaching submission defence?

Surprisingly, I don’t teach submission defence in class.

There are only a small number of contact hours with athletes each week. We must focus on the areas that make the biggest and most immediate gains to most efficiently use our time. Teaching submission defence cuts into time that could be used for more important things.

Does this mean that our grapplers are lacking knowledge of submission defence? Not at all. Consider when a grappler is away from the gym. Is this just dead time or can it be utilised?

Say a grappler gets caught in a submission but knows how to defend and escape. The roll with continue and s/he will quickly forget that a mistake was made that lead to being caught in the submission.

Another grappler gets caught in a submission but doesn’t know how to defend and so must tap. When away from the gym, this person will remember being forced to tap. S/he will think about how the submission happened, and try to come up with ways to avoid being caught again.

The grappler is now utilising the dead time when not at the gym, and is developing the most important skill in grappling – predicting what is about to happen next.

Does this mean I never teach submission defence? No. However, submission defence is only taught one-on-one. When a grappler is being caught repeatedly and has not been able to discover a defence, that is the time to give some hints.

A coach’s job is to develop highly skilled, self sufficient grapplers. This means setting up situations where the athletes wants to take control of their own training. Not teaching classes on submission defence is one way we achieve this.

Head-arm choke details

Most BJJ classes have people of mixed levels. Beginners benefit from the advice and feedback from those with more experience. Advanced members benefit from having less skilled training partners to refine their skills against.

How does an instructor run a training session that will benefit members with differing ability? One solution is to break the topic into levels. Beginning levels provide only a coarse overview of the most important details. Subsequent levels add additional details. Levels are created so that each level builds on the experienced gained through practising the previous ones.

Each level is small and simple and easy to digest. Having multiple levels allows members to work on the area that will have most benefit to them.

To illustrate, here is an example of using levels to teach and practice the head-arm choke.


Focus on the details at your level. Only level up once you’re sure you’ve internalised the details. For later levels, ensure you can consistently perform all details in your level on a resisting opponent.

Level 1. Core finishing details.

  1. Elbow of your arm encircling your opponent’s head must be on the mat.
  2. Skull to skull contact.
  3. Squeeze, hold, wait. It may take up to 12 secs for opp to tap.

Level 2. Tightening details.

  1. Start from mount.
  2. Push opp’s arm across and encircle their head and arm.
  3. Block opp’s temple with your hand while you drill (screw) your encircling arm deeply under opp’s neck. Goal is to have your biceps snug against opp’s neck.
  4. Gable grip, dismount and finish as before.
  5. Question: which way should you gable grip your hands?

Level 3. Keeping your opponent flat. (opp resists)

  1. Opp must be flat (not on side) for you to finish.
  2. Your biceps pressure and skull-to-skull counter pressure attaches you to opp. Your bodyweight keeps opp’s shoulders facing up.
  3. After dismounting, position your belly/thighs flat on the mat. Get as low to ground as you can.
  4. Ask your opponents to turn to their side. Ensure you can keep them flat.
  5. Question: What angle should be between your spine and your opp’s spine? You may need help from someone experienced for this.

Level 4. Dismounting. (opp resists)

  1. Start on mount with opp’s arm across, tight arm position and gable grip.
  2. Your goal is to dismount then finish.
  3. Opp’s goal is to prevent you dismounting and to free their trapped arm.

Level 5. Squeezing details.

  1. Remember; squeeze, hold and wait.
  2. Don’t squeeze unless the choking arm is already snug (recall level 2).
  3. Moderate tension in biceps of choking arm (not too tight so as to avoid fatigue).
  4. Wrist flexion and adduction of choking arm to apply pressure of your biceps against opp’s neck.
  5. Push with your toes to apply pressure of opp’s shoulder against their own neck.
  6. Be conscious that your biceps applies pressure against one of opp’s carotid arteries while opp’s own shoulder applies pressure against the other.

Level 6. Understanding counters.

  1. Opp’s main counter is to free their trapped arm so their shoulder is no longer choking them.
  2. Opp has to relieve skull-to-skull contact before freeing their trapped arm.
  3. Turning on their side is a good way to relieve skull-to-skull contact.
  4. Takeaway: get your opponent flat and maintain skull-to-skull contact.

Level 7. Zero point.

The zero point is when:

  1. Your opponent’s arm is trapped in position for the choke.
  2. Your arm is encircling their neck.
  3. You have (or are close to having) skull-to-skull contact.
The most effective submission in BJJ

Rickson Gracie demonstrating the rear naked choke

There are many different submissions in BJJ. Some are more effective than others. If our goal is to submit our opponents, then it makes sense to focus more of our training time on the most effective submissions.

In BJJ, we get very good at almost breaking our opponent’s joints. We take the joint to the limit of its normal range of movement and then our opponent concedes the submission. We don’t actually break the joint.

An armbar, kimura or heel hook is devastating only in theory because we never follow through to the end of the submission hold. We need practice to gain competence in a skill, yet we can’t gain that practice in a friendly gym.

A successful joint attack involves moving the joint to its limit of movement and then moving it beyond that limit. We regularly practice taking the joint to its limit of movement, but we don’t have experience in applying the force and movement necessary to move it beyond.

Chokes and strangulations differ to joint attacks, in that they can be trained in a way that gives us confidence we can complete the submission. A successful strangle involves a squeeze, a hold and then a wait. Our opponent concedes the submission during the wait portion. Completing the submission only involves maintaining the hold and waiting longer. No additional force or movement is required, only endurance. This gives us more confidence that we can take a strangle or choke to completion than we can a joint attack.

The most effective submissions are those that we have practiced to completion. We can’t take submissions to completion in the gym as we need to respect the health of our training partners. So the most effective submissions are the ones that we can practice the closest to completion, namely chokes and strangles.

That's not a real move

Would you tap to this?

Jiu-jitsu is a contest between two people to see who can make the other give up. It’s fun and we want to do it every day, so we have rules that ensure no-one gets injured.

The rules are simple

  • stop when the other person taps
  • use a mat on the ground to prevent wear and tear on the body
  • no moves that will cause injury before the other person has a chance to tap out (no biting, scratching, striking etc)

And that’s it.

The art of jiu-jitsu is to be able to make someone bigger and stronger than you submit. This is the goal we keep in mind when we train. To do this, we train sophisticated moves that require minimal strength and athleticism as these moves have the greatest change of defeating someone bigger and stronger.

There is a problem that many practitioners face after they’ve been training for a couple of years. They forget that the game of jiu-jitsu is to make the other person give up. They think that the game of jiu-jitsu is to make the other person give up by using jiu-jitsu moves. This happens because they have become so used to looking at the small details of jiu-jitsu, that they have forgotten the overall larger picture.

At the end of the day, a tap is a tap. Whether it is due to an armbar or a simple head squeeze, makes no difference.

Overlooking this will slow your growth at best, and result in injury at worst. Practitioners at this stage of their development will say things like “I had to take a week off from training because my neck was so sore from being cranked. It hurt at the time but I didn’t tap because it wasn’t a choke”.

There are sophisticated moves that require skill to perform, and unsophisticated moves that only rely on brute force. Both are valid.

To be good at jiu-jitsu means being able to defend both types of moves. When something hurts, tap and then learn how to prevent it so it doesn’t make you tap again.

“How do I finish the armbar?” This is a common question that beginning students ask. The typical response to this question is “Squeeze your knees together, point your opponent’s thumb away from your chest then raise your hips”. This is fine instruction for a raw beginner. Once the beginner starts to gain more experience, they receive more details “Pull your heels towards your butt, touch your toes together, hug your opponent’s arm to your chest”. Students can easily be left with the idea that to get better at a technique, you must learn more details for that technique.

The problem with this detail oriented approach is that the student doesn’t understand why the armbar works. This means they can’t troubleshoot when it fails. Consider the fight between Georges St. Pierre and Dan Hardy during UFC 111. During the first round, GSP has a tight armbar on Hardy, but Hardy escapes. Why did the armbar fail? What mistake did GSP make that allowed Hardy to escape?

Georges St. Pierre attempting armbar on Dan Hardy - UFC 111

Georges St. Pierre attempts an armbar on Dan Hardy at UFC 111

A detail oriented student will claim the armbar failed because GSP didn’t squeeze his knees together, as this is the obvious detail that is absent. If you do an Internet search you will find many people claiming this to be the reason. This is incorrect. If GSP did squeeze his knees together, Hardy would have escaped even earlier.

To understand why the armbar failed, we must first understand the principles behind the armbar.

The arm is essentially two rods connected with a hinged joint. The goal of the armbar is to hyper-extend this joint beyond its maximum extension, using the strong muscles of the legs and hips. The armbar is achieved by clamping the ends of these rods (shoulder and wrist) in place while the hips push into the joint to hyper-extend it. The obstacle to performing the armbar is that the shoulder can rotate so that the elbow is no longer in line with the force applied by the hips. This rotation removes the hips ability to hyper-extend the elbow.

The principles behind the armbar are:

  1. Immobilise both the wrist and the shoulder
  2. Ensure the elbow is in line with the hips
  3. Raise the hips to hyper-extend the elbow

All the details we know about performing the armbar are to assist with these principles.

If we re-examine the GSP vs Hardy match, we see that initially GSP has immobilised Hardy’s wrist and shoulder. Hardy manages to rotate his elbow to prevent the hyper-extension. GSP changes his grip on the wrist from a tight elbow hook to a double wrist grab. This is the mistake that causes the armbar to fail. GSP would like to rotate Hardy’s hand so the elbow also rotates to become in line with his hips, but he cannot got a good grip due to the gloves. The double wrist grab is not strong enough to immobilise Hardy’s wrist, so it is only a matter of time before Hardy escapes.

Squeezing of the knees would not have solved GSP’s problem. Squeezed knees might have made it slightly more difficult for Hardy to rotate his elbow, but it was the loss of wrist immobilisation that allowed Hardy to escape.

Beginners respond well to a detail oriented approach to learning BJJ. But to move beyond mere competence, student’s require the principles involved so they can understand the purpose behind the details.