Head-arm choke details
 Most BJJ classes have people of mixed levels. Beginners benefit from the advice and feedback from those with more experience. Advanced members benefit from having less skilled training partners to refine their skills against.
How does an instructor run a training session that will benefit members with differing ability? One solution is to break the topic into levels. Beginning levels provide only a coarse overview of the most important details. Subsequent levels add additional details. Levels are created so that each level builds on the experienced gained through practising the previous ones.
Each level is small and simple and easy to digest. Having multiple levels allows members to work on the area that will have most benefit to them.
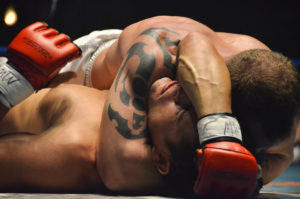
To illustrate, here is an example of using levels to teach and practice the head-arm choke.
Focus on the details at your level. Only level up once you’re sure you’ve internalised the details. For later levels, ensure you can consistently perform all details in your level on a resisting opponent.
Level 1. Core finishing details.
- Elbow of your arm encircling your opponent’s head must be on the mat.
- Skull to skull contact.
- Squeeze, hold, wait. It may take up to 12 secs for opp to tap.
Level 2. Tightening details.
- Start from mount.
- Push opp’s arm across and encircle their head and arm.
- Block opp’s temple with your hand while you drill (screw) your encircling arm deeply under opp’s neck. Goal is to have your biceps snug against opp’s neck.
- Gable grip, dismount and finish as before.
- Question: which way should you gable grip your hands?
Level 3. Keeping your opponent flat. (opp resists)
- Opp must be flat (not on side) for you to finish.
- Your biceps pressure and skull-to-skull counter pressure attaches you to opp. Your bodyweight keeps opp’s shoulders facing up.
- After dismounting, position your belly/thighs flat on the mat. Get as low to ground as you can.
- Ask your opponents to turn to their side. Ensure you can keep them flat.
- Question: What angle should be between your spine and your opp’s spine? You may need help from someone experienced for this.
Level 4. Dismounting. (opp resists)
- Start on mount with opp’s arm across, tight arm position and gable grip.
- Your goal is to dismount then finish.
- Opp’s goal is to prevent you dismounting and to free their trapped arm.
Level 5. Squeezing details.
- Remember; squeeze, hold and wait.
- Don’t squeeze unless the choking arm is already snug (recall level 2).
- Moderate tension in biceps of choking arm (not too tight so as to avoid fatigue).
- Wrist flexion and adduction of choking arm to apply pressure of your biceps against opp’s neck.
- Push with your toes to apply pressure of opp’s shoulder against their own neck.
- Be conscious that your biceps applies pressure against one of opp’s carotid arteries while opp’s own shoulder applies pressure against the other.
Level 6. Understanding counters.
- Opp’s main counter is to free their trapped arm so their shoulder is no longer choking them.
- Opp has to relieve skull-to-skull contact before freeing their trapped arm.
- Turning on their side is a good way to relieve skull-to-skull contact.
- Takeaway: get your opponent flat and maintain skull-to-skull contact.
Level 7. Zero point.
The zero point is when:
- Your opponent’s arm is trapped in position for the choke.
- Your arm is encircling their neck.
- You have (or are close to having) skull-to-skull contact.


Leave a Reply
Want to join the discussion?Feel free to contribute!